Part 2/4: How it went
This is part 2 in series of 4. Part 1 is "how it started", part 2 is "how it went", part 3 is "how it ended" and part 4 is "The Good, the Bad and the Ugly".
This is a part 2 "how it went" or more of a "how I did my part" as I can't tell it from another person's perspective. Also it's a technical talk which goes to code level detail at some parts.
So where we left of? Oh yeah, we got project started: theme related idea, Trello Kanban board, Github repo, Godot setup and artstyle was chosen. Everyone got the work on their part.
We started listening some Zambla, a artist who's songs Béphane shared in the chat for inspiration. (btw. I don't speak French, but it sounded good)
I started filling some things we need to do to Trello. After that started working on the dialog system.
1. The Dialog system
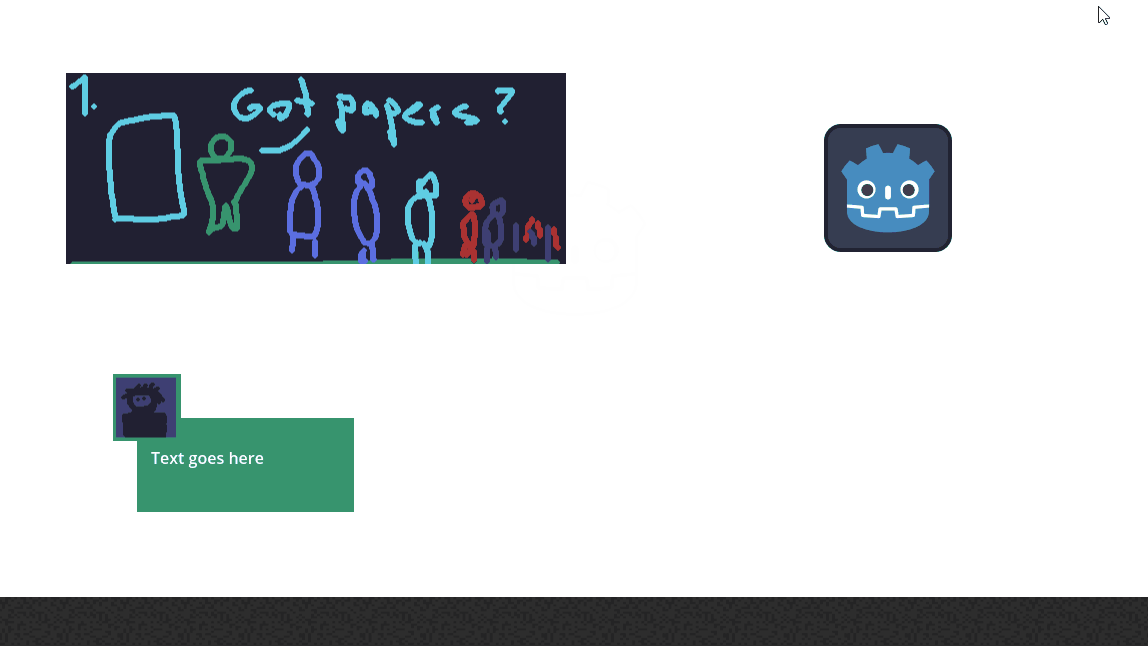
Dialog systems job was to show dialog box, dialogue text in it and person's face at one of the sides of the dialog box. Not much later I added more placement options, like the middle top text, that was mostly used for the storyteller's dialogue. Then I added also two sounds for the dialogs. These were recorded with microphone to Audacity and then edited there somewhat to make them fit better. At some point came in the scene changing we needed, I started integrating actions to the dialog system. Actions also included stuff like closing the dialog and freeing player to move, start a minigame after dialog ends, hide and show player(for the toilet scene) and changing the song(DJ dialog). Later changes to the code where adding dialog text to appear a character one by one and skipping that animation process.
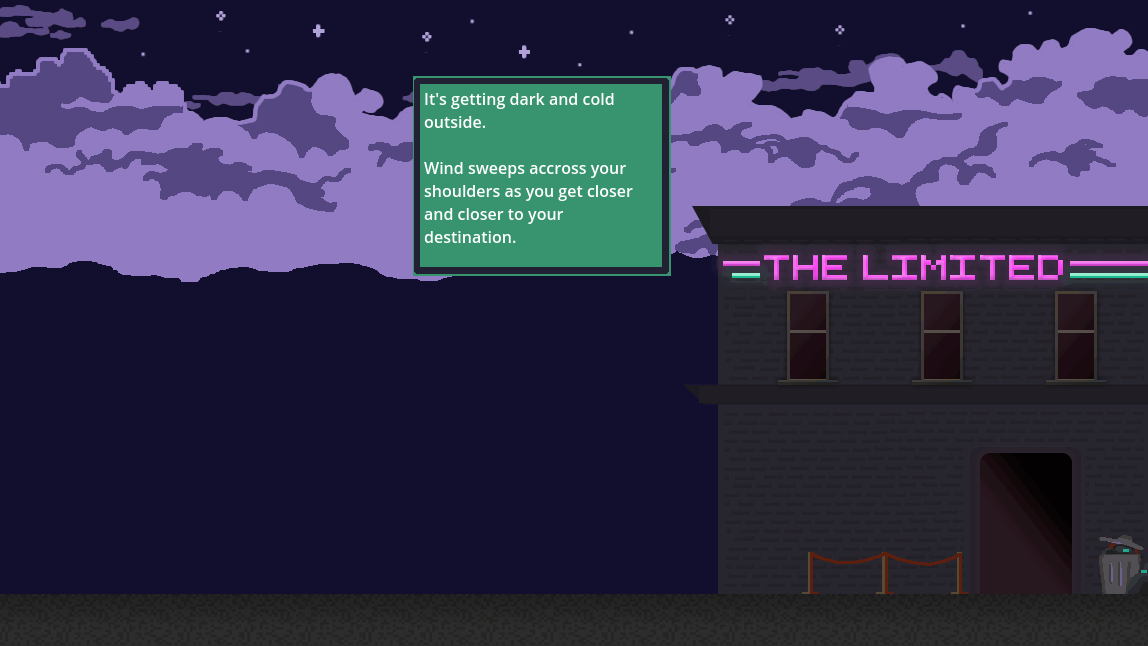
Here's the dialog system working at a later stage, still in WIP:
Rest of this blog post is more technical stuff, you can skip it if you're not interested. You don't miss nothing much about the story.
Spaghetti code disclaimer:
So to get to the meat of things. This next part will include some spaghetti code, that could be improved in many ways, but for the gamejams timelimit it was sufficient to a point. This can get very detailed for some of you and maybe boring even, bare with me. Though if you are not code-savvy, just scroll through to your interest. I'm not saying this is the right way to do things, but maybe if you are new to Godot or game development or programming in general, this maybe helpful to some of you. This is not a tutorial either, it's not in order of what to do and not everything is explained.
For starters, I needed to figure out how I can store and edit easily those dialogs we have. We ended up having 7 level scenes and 9 "acts" of dialogue. Some of these take place in same location so there is multiples. Like first scene outside the club and the scene after the hotdog vendor scene. Some scenes have multiple acts, because wanted to end the last act for some reason... I don't think it was necessary, but it is there. Maybe it could be used to branch out depending on players decisions.
So I tried to use gdscript to create a array of strings first. Got it working. It only contained the information what the dialog text would be. It was not enough, I wanted more.
Then I tried adding custom class named Dialog. It ended up being scrapped, because I couldn't get it to work as exported variable so I could change the content of it depending on what scene we are on.
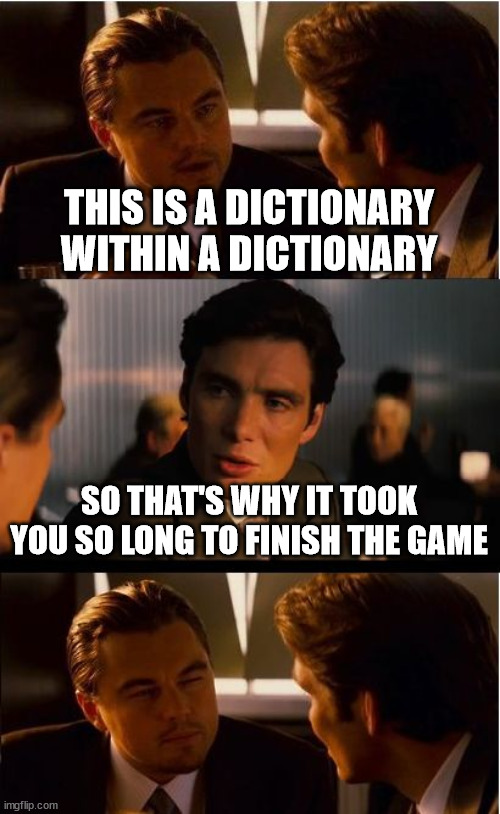
Then I tried gdscript's Dictionary, well it works, you can have key-value-pairs. and even another dictionary inside the first one. Problem with that option is the many possibilities, you had to define type for every key and value:
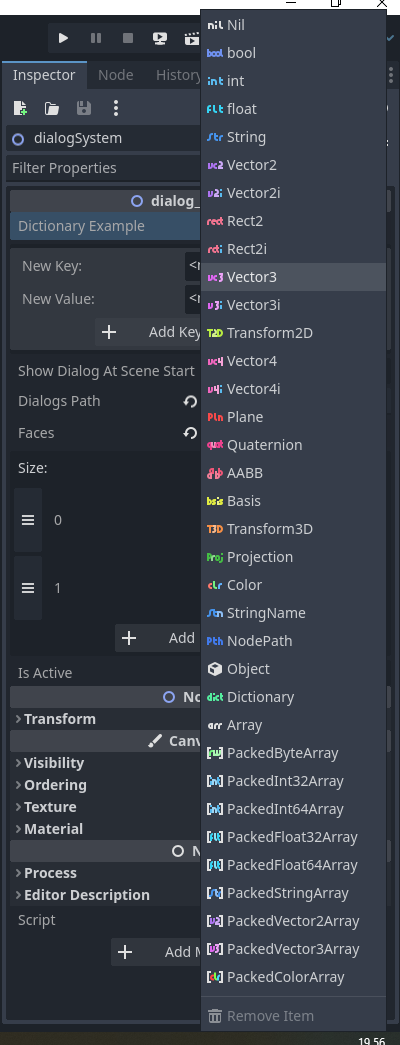
Yeah, we got options for days. Think of me selecting these for every single text dialog you could see. Dictioception!
So Dictionary wasn't really a good option either. Ok then. What could be done? I know, let's do our own format or something and parse it from JSON. I started working on the json-parser. Seems like someone else had already done the same. Oh but it was for Godot 3. It didn't work anymore on Godot 4. After a while trying out and looking up the documentation I got it to work. Behold our dialog loading function:
Well it could be any JSON file loader, because gdsript doesn't care of the type so much.
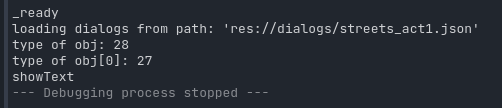
Printing out type of that obj-variable tells its 28. Which is not very useful. Why can't it directly tell it as as string? Of course this is more useful in this format for programming reasons, but for debugging it means extra work to find out what is that? A enum of sorts? After some searching through the documentation and godot editor, I find Variant.Type, turns out 28 is TYPE_ARRAY. Well in our usecase we do have json with top level as array. So what's inside it? 27 of course! Which is TYPE_DICTIONARY. OK... In our json-file it's an object. But it works. But what are the key and value pairs? Well, it's bit more complicated, but not really. It is actually an object with multiple values, which is multiple key-value-pairs. Gdscript makes it simple for us to use really, even though its not forcing the types to be used. (it's somewhat typeless programming language)
So what's in the json you may ask? This:

This is from club_act3.json, One of the last ones in the game. I'm proud of the writing, but that is not why I'm showing expesially this one. I show this because it has multiple things going on that we implemented or did work out of the box. I've highlighted them. Starting from the top "\n" means newline, it prints the text after it on new line. This and the next one which is that "[color=#...]" with end part "[/color]", and even the "[i]", "[/i]". These worked out of the box for RichTextLabel-Node we used. These give us formatting options to do colors, underlines, fontsizes, you name it. There is a caveat to it, I'll explain it later. Next we have "action"-key and "minigame"-value. This action gave us option to add whatever action triggers we wanted to do at the end of the dialogue, like starting a minigame or changing scene to next one.("next_scene"). Anyway the json could contain pretty much anything. Those are just key-value-pairs or params with values, that don't need to have specific name. I just chose those. At start I had actions values to be enums, so they were integer numbers in the json, but this turned out to be harder to read and understand on the fly what it does. "wait what was action 3 again?" - I would have to check it up where I store the enums. So text was easier in many ways. As long as the strings are written exactly right. This was one issue as well, but I fixed it in the json as actions didn't happen. Better fix would have been to check there is correct action text in there and throw an exception when it's nonsense.
Before I show the next code, let's give some context on the dialog_system scene:
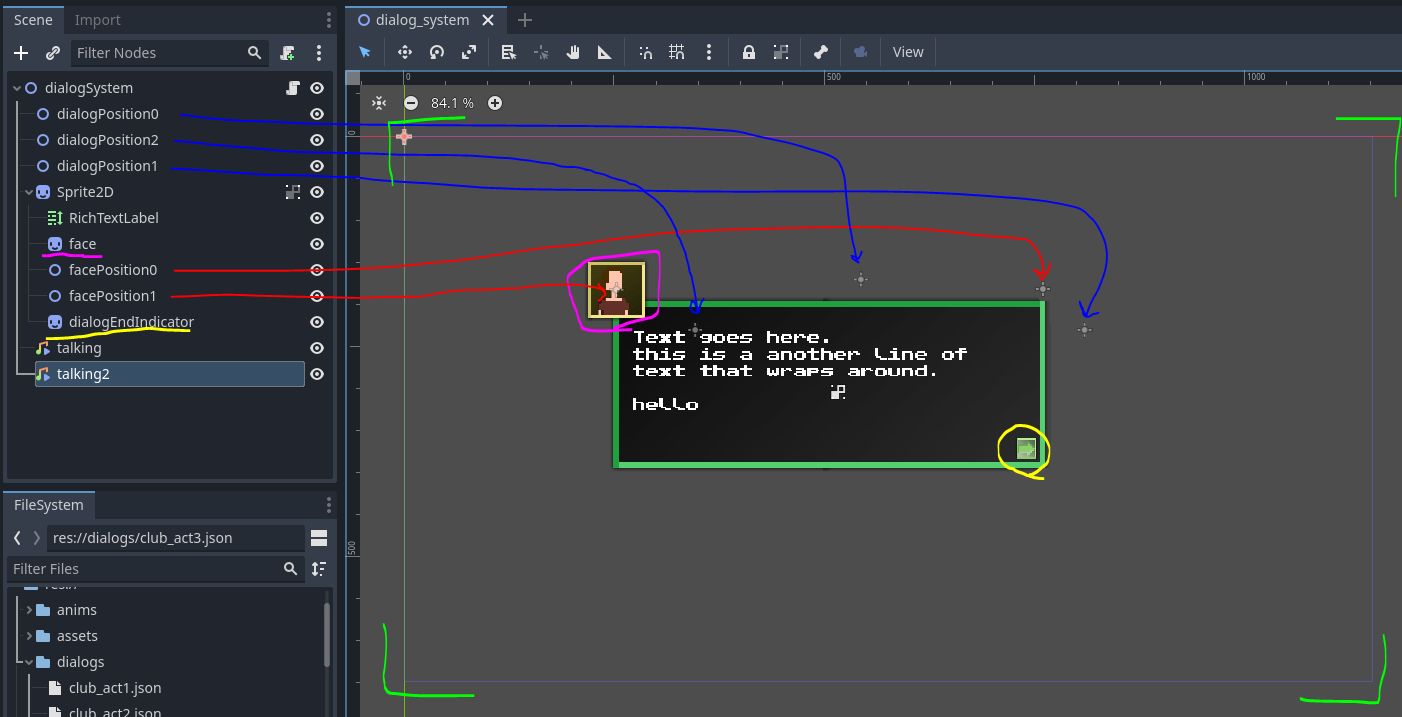
I've highlighted few things: green cornered area is our camera size, which is the default resolution of 1152x648 pixels for Godot 4.1. Next we have in blue three origin positions where the dialog-box could be positioned. Dialog-box itself lazily unnamed from the default node-value is "Sprite2D". RichTextLabel-node also, which render the actual text there shown. Face-sprite in magenta highlight, could be positioned in two positions next to the dialog-box, which are pointed with red arrows. "talking" and "talking2" are AudioStreamPlayer2D-nodes. They have different sound attached to them.
Let's skip to the part where these dialogues are interpret, the showText()-function:
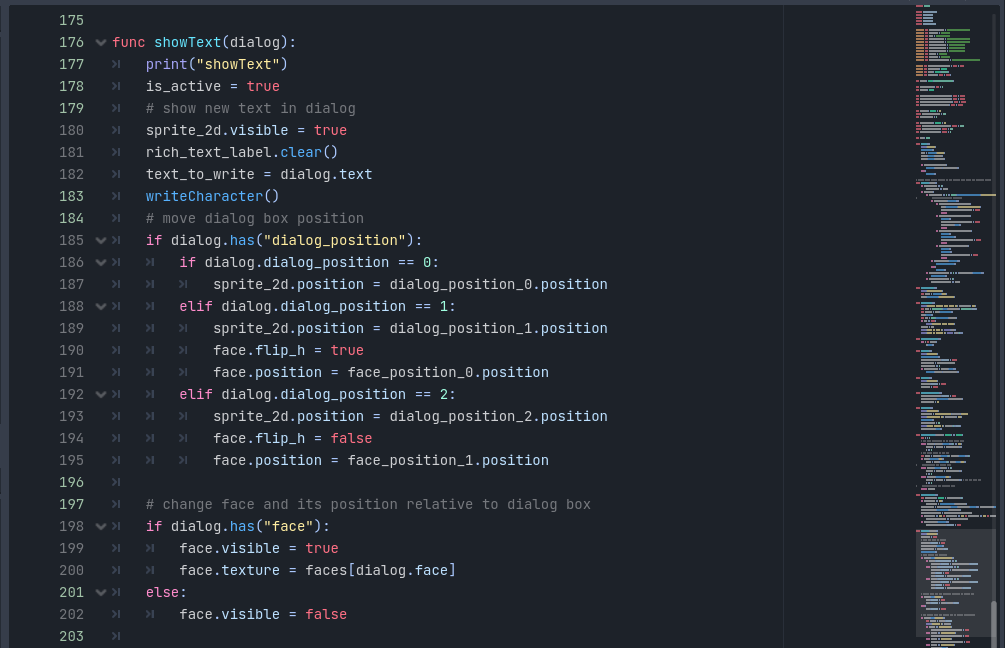
Well, that's the start of it. Here we interpret the keys we got in the json file. it has been put to dialogs-variable and here is a single row of that used as "dialog"-variable. We set the dialog box state as active, so player can't move while we show dialogs. We put the dialog-box visible, otherwise in the code it's hidden. Clear the earlier text shown and set to a variable "text_to_write" the whole string we got from the dialog-variable. Then we write in different function them characted by character, in this case the first one and later on more. Then we get to the good stuff. The juicy bits and bobs. we parse through the parameters(keys as mentioned earlier). Check if they exists with dialog.has()-function. Remember the one row at this point is type of Dictionary in gdscript. We access the parameter. In this case you can see we change the dialog-box position, flip the face-sprite according to that dialog-box position. Then there's check if we even show the face, because it can be left out.
Is that it? Nah, it continues little further:
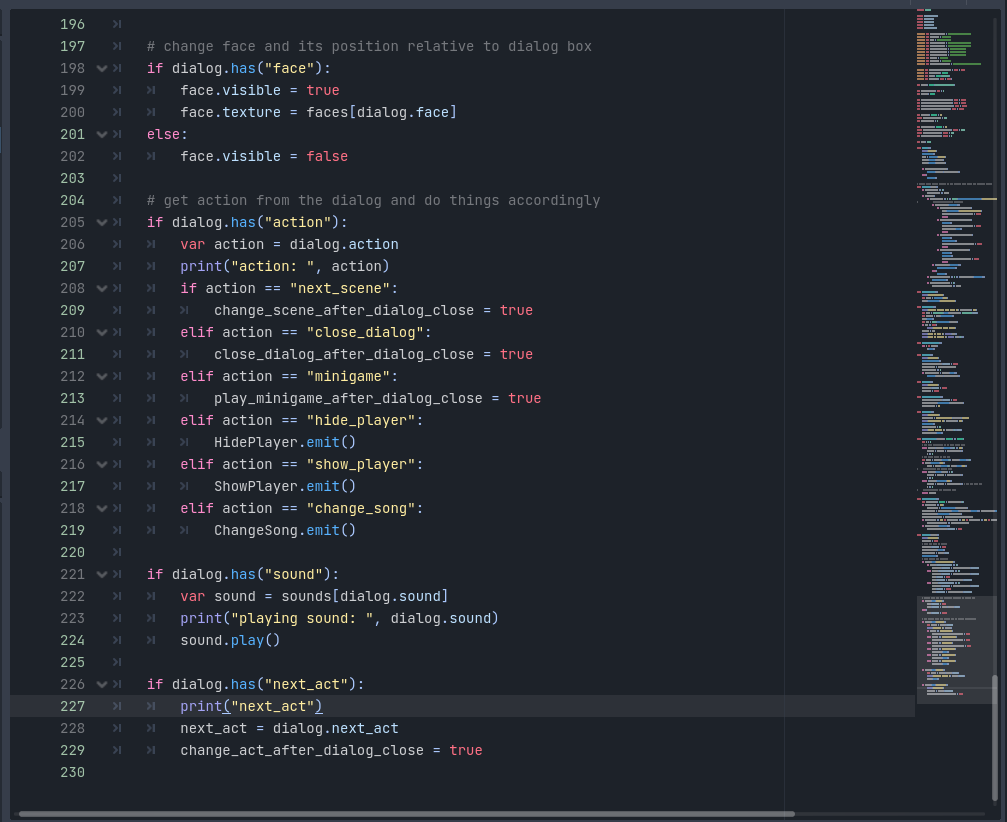
Here we see the rest of that function. We interpret the "action"-parameter. This could be switch-statement also. Oh wait there is no switch-statement, it's called "match" for some reason. Instead of lighting the world on fire with the match, I use just if-statements. It works. Then there is "sound"- and "next_act"-parameter. If you take closer look what these do, we see that some of them emit signals and some of them set boolean variables. These boolean variables are used, when the user next time initiates the interaction key(SPACE on keyboard), it will trigger that action when it closes the dialog. "next_act" is separate parameter, but could be as well just one more action-parameter value.
Hold on, this is way ahead. What happens at the start? Ok, let's take it easy for a second and get to the beginning:
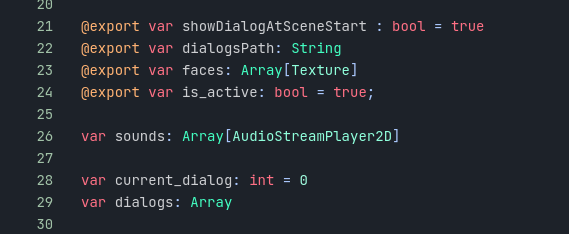
At the very top we setup some variables. Including these exported ones. We are interested in the dialogsPath-variable especially, because it will contain the path to the actual json file. Second important one is "faces"-variable. Faces will contain the sprite textures we are going to use. These exported variables then are accessible in the Godot editor on the Node's inspector:
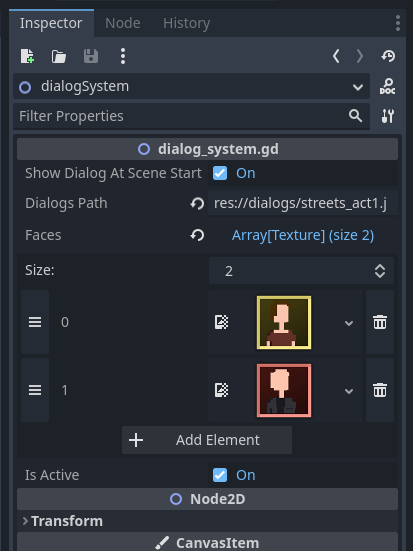
As seen above: dialogsPath can be set. It is direct path inside the resources-folder("res://"), which will be built with the game and the game can access it internally. Faces here are an array, you can add as much faces there you need to.
But how does the dialog_system start? It is added to the level-scenes as a child(though better place could have been parent node of that, which stays between levels and would need less maintenance for each level). Top level of the dialog_system Node-structure has this script we have been reading about.
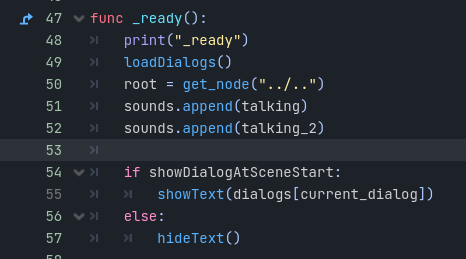
_ready()-function runs when the Node that the script is attached to loads first time in the scene. Here we load dialogs from the json file we set in the export variable.
This is what dialog system's _process function looked at the end of Ludum Dare:
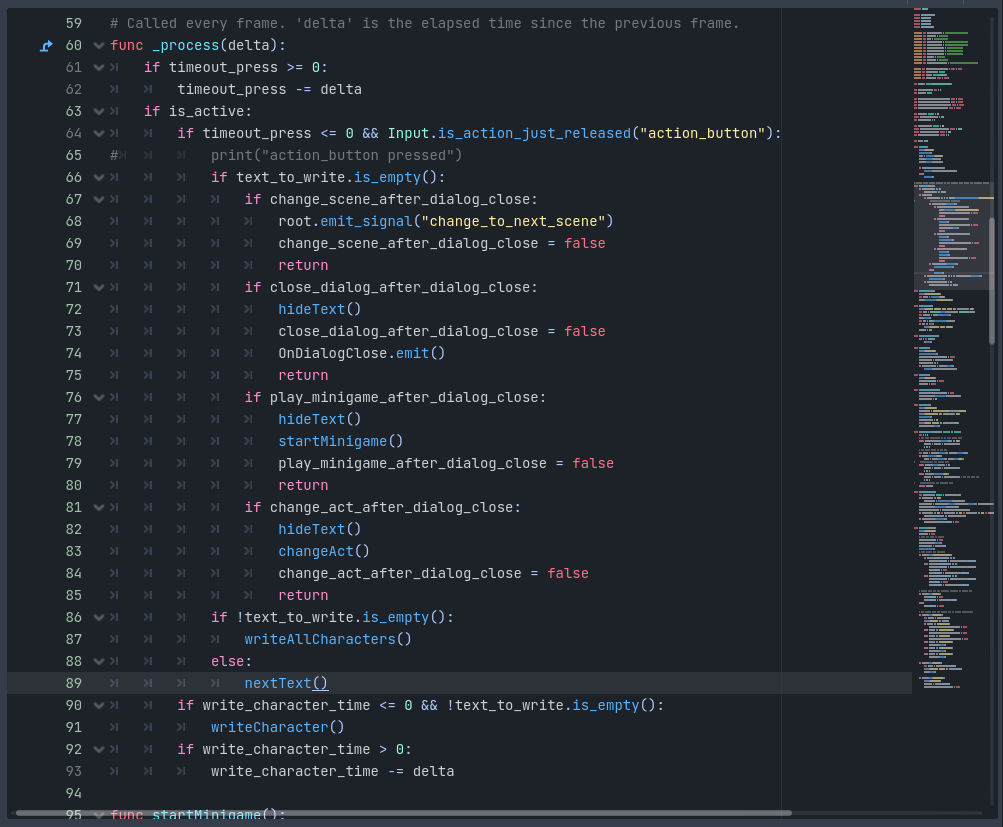
let's break it down: First there is a timeout_press variable that has time set to it so you can't spam the action_button to skip dialog too fast. This also fixes the problem when opening the dialog first time skipping to the next dialog text at start. We check if the dialog should be even running with is_active-variable. check the timeout timer and if the action_button is pressed. then if there is text still to write, we skip to writing it (text_to_write-variable) character one by one. We will get to that soon. If there is no more text, we check for actions that should happen after writing the text and action_button pressed at that point. most of them also close the dialog, except the scene changing one, as this dialog_system was child of the level-scene that would be changed. Also I used the root-variable here that refers to the root-node at top level of our scene we added. This could have been done better to send signals to a group, but again time issues, spaghetti code. Would do it better now afterwards thinking about it and knowing more. Then there's timer for time between each character to write and check it's time to write it above it.
So the character writing function, writeCharacter():

It's just getting the first character from the saved variable text_to_write and putting it on screen. Though if it contains param string, like "[color=#ff0044]" or something like that, we need to get the whole string to the end of that param, because otherwise that param would be show as string in the dialog and not take effect as it should. So we parse through the text to the end. Then there's check for special characters like "." or "," or "?" or "!" or "]", if it's one of those we add little extra time after that character has been shown to make the text appear in a more natural way. Otherwise it looks very robotic, every letter coming to the screen at same speed. This also allow us to make the text appear slower at times when we add those characters as multiples.
So what's in the getParamString():
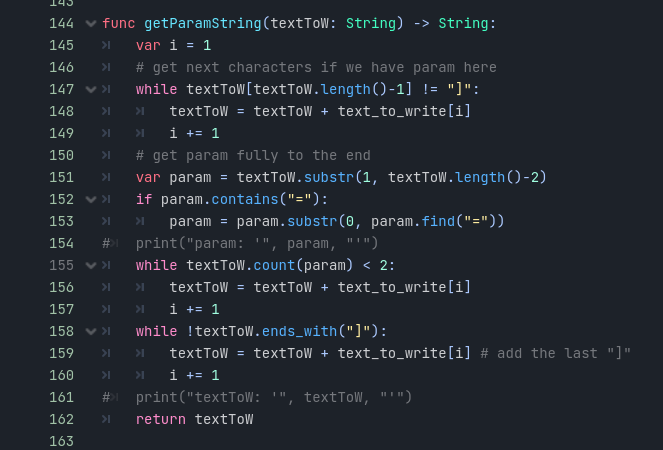
We have the start of the param already: "[", so we want to continue to the end: "]". Then we check what is the parameters name by substracting it from that string. for example "color" or "u" or "i". in case of color, we stop at "=" as the start of the param has value associated in it. Now that we have the param name, we can parse through to the next point in the dialog text to get the end of that param.(while textToW.count(param) < 2) This only works in this sense as we keep the params very simple in the dialog text. We do have inner params like "[color=#foobar][u]hello world[/u][/color"], but it works with that too! We don't need to care about the inner params at all, as long as they don't have the same name. at last while loop we get the closing bracket for the param: "]" and return out of the function with that result. This means we need to show the whole text that is within the param brackets. There's ways around this by saving all the characters in between and pushing them in one by one between the brackets, but didn't thought that at the time making this.
Then there are some other functions that are self explanatory at this point like writeAllCharacters()-function, that is used when user presses action_button while the dialog is still adding characters. But lets mention the changeAct()-function though:
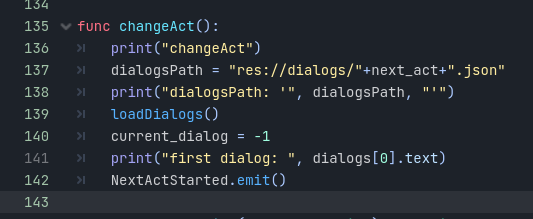
It changes the dialogsPath to the next_act that was given at showText()-function and uses the same loadDialogs()-function to do the json-stuff. Then we emit that the task is done to do other things with that info somewhere else. current_dialog-variable keeps track of the dialogue we are on that act. I set it to -1 as in nextText()-function it will be incremented at start. and nextText() is called when user initiates the dialog_system active.
By the way, if you got this far, please give me some feedback or just leave a comment: "I like happy martinis!".
So what's in nextText()-function you may ask? Or maybe you don't at this point, you're probably bored already. Don't worry, it's a simple one:
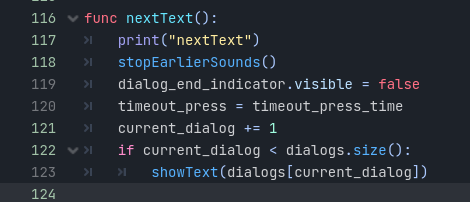
First of it stops sounds that are still playing. Those mumbling talky bits. As player can skip to the end of the dialogue and start next one, we don't want the mumbling to keep going. You interrupted him, how rude! Ok then we hide the end of dialog indicator, it is shown when the writeCharacter()-function is run. There's setup for the timeout pressing action_button to activate dialog. Then we set the current_dialog as mentioned earlier, we set it to the next one. And showText()-function is run if we are not shown the end of the dialog yet.
That's about it. You can put the pieces together and see what you got.
TLDR recap:
1. save dialog as a json-file.
2. load it when the node gets loaded in the scene.
3. when player initiates dialog, render text on the screen, character one by one.
4. allow dismissing the dialog.
5. when closing the dialog, initiate action that was in the dialog data or go to next dialog text.
Last part was mostly adding more dialogue, fitting minigames in and scene changes.
2. scene changing
So how that happened?
Well, as Godot is made of Nodes within more nodes. We have a infinite possibility of nodes upon nodes. We created a root-Node called "root", how imaginative don't you think? Which will contain the level-scene as a child of it.
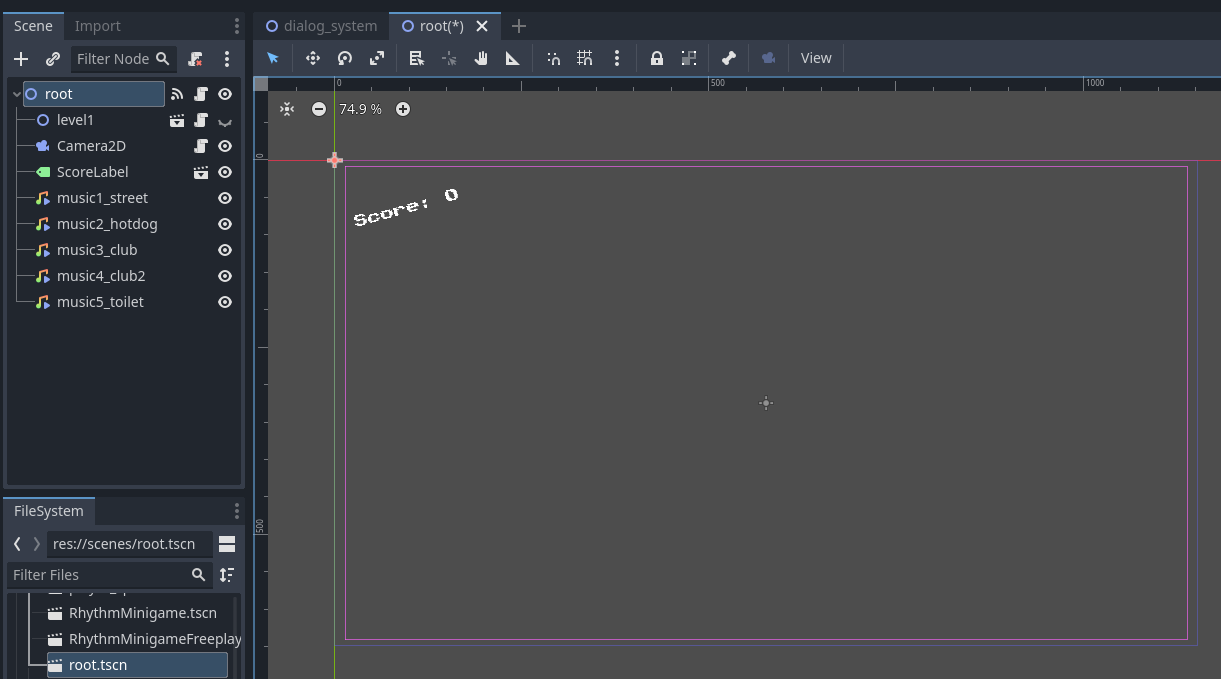
root-scene. I left the level1-node as invisible so we can see only what the root node contains in the 2D-view. Well, nothing much more than the score-counter really and a camera. Camera was added so we could do the camerashake and I made it zoom little so the edges of the scene would not go outside the created background area. It worked fine. I won't go to detail about the camerashake as it's just copy of a script you can find online yourself or make your own easily. Root-node also contains some AudioStreamPlayer2D's which are named "music1_street" etc.
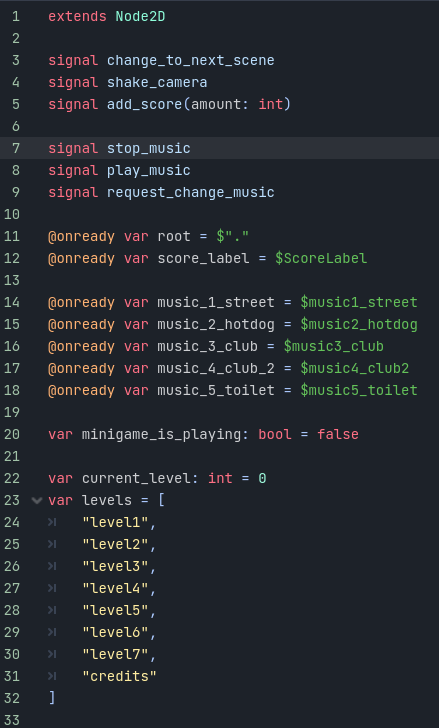
At the start of the root-node script, we have some signals, these were bit redundant at some points. They are named self documenting so I won't go to much detail about them. Then there's @onready variables, that are loaded to the scene when the node is loaded, it will do the connection for that variable at that point. All of them are child nodes of the root-node, so this was just a easy way to access them as variables without more hassle. minigame_is_playing variable is related to the music too, we need to know if minigame is playing so we can stop the music from the root playing. Then there is current_level to keep track of the level we are on and a string-array of the levels available. As you can see it has mostly levels named "level" and "credits", we could have had more describing names here. But to keep us not going mental about filename changes, we kept it like this. As there were some conflicts with naming and such which took us extra time to fix. But that is a story for another day.
We will skip to the next_level()-function:
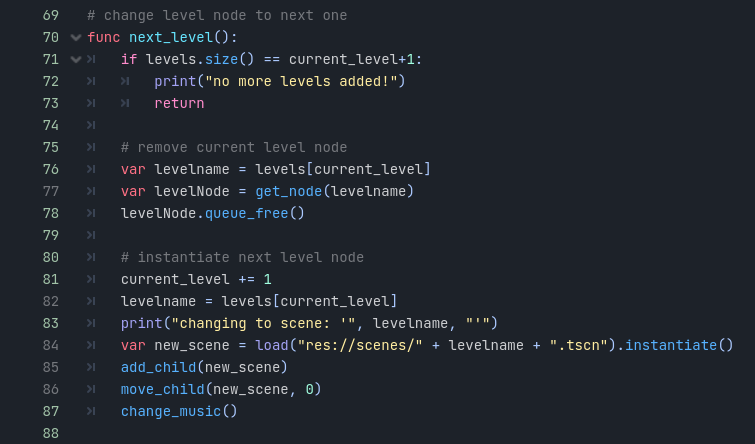
It does what the of it says. Check there's levels left to go through first. Then if there is, we get the current level's name from that levels-array. Then we can get the node current node's child node, for example that "level1"-node. And we throw it away with .queue_free(). WE don't need it anymore! muahahhaa! increment the current_level, fetch next node's name, then we load it from the resources folder with that name and instantiate it as a node and splat it as a child in the root-node. And move it as a first child so it is rendered at the bottom, we want still our score to be seen on top of it. Because add_child() adds the node by default as last child. Lastly we change the music to specific to that scene.
3. Uninterrupted music
We had a problem music stopping and starting all over again from start when scene changes. We had the audioStreamPlayer2D-node in the level-scenes. So it was in the instance that will be removed when the level changes. Also, we wanted the music seamlessly to keep going if it's the same song. So I moved all audios to the root scene, so they stay in the scene all the time.
We had multiple audio files for the same songs, as you can hear in the game, when you move to different level, for example from the club scene to the toilet room, the music gets more muffled/dampened, so it sounds like it's coming from another room. These are different audio files playing. We need to keep track where the last audiofile stopped when the scene changes and start the other one from the same position. This is expecting they are same song and same length audiotracks and they are timed to the beat same.
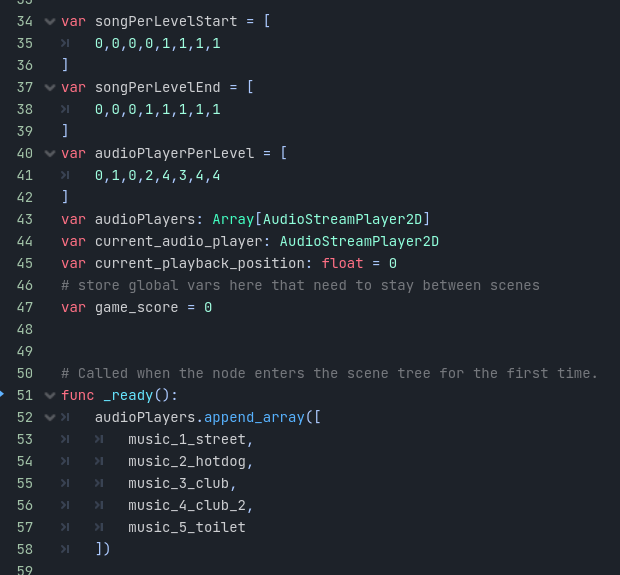
some variables at the start of the script for music. We store info about the song that should be playing at the start of the level and at the end of the level. Then there is audioPlayerPerLevel which is the index of the audioPlayer we want to be playing. Then there is those audioPlayer-array where we store them in the _ready()-function. music_1_street, and rest of them are shown few pictures earlier, that they are loaded onReady from the scene and added here to a array. Then there's also vital information which audioPlayer we are currently using and what position is the playback on when stopped.
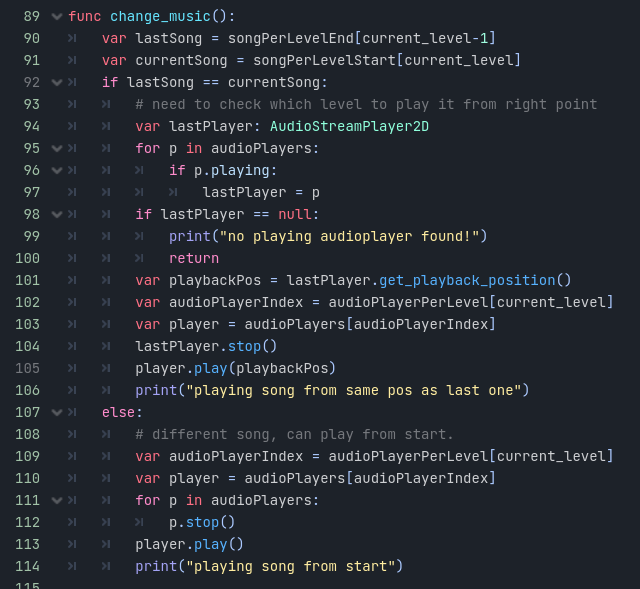
in the change_music()-function we firstly get the lastSong that was playing and a current song we want to start now playing. If they are same song we need to do the transfer of playback position into account. We get the audioPlayer that is playing currently and get the playback position, it's a float value by the way. Get the new audioPlayer index in the audioPlayers-array, get the actual player and stop the last one and start the current one from the playback position. Otherwise if it's a different song, we don't care it starts from the beginning, just remember to stop any other songs before it. Then there is a function for stopping the audioPlayers that can be called when minigame starts playing. And a _on_play_music()-function to start the playback back from the position we were on before the minigame, so we can get back to the funky jam we where on!
That's about it for today, if you liked reading this or not, please leave a comment anyway.
Next part is part 3. "How it ended", which will contain some story how we got it all together and managed to finish just in time. Part 4. probably will be our retro, if we get it done. I'm asking the guys to give some feedback how the gamejam went from their point of view and write about that.
Leave a comment
Log in with itch.io to leave a comment.